You’ve finished writing a book. Congratulations! That takes a lot of hard work and dedication. But that hard work has only just begun. If you intend to get that book into the hands of readers, then you have some choices to make. Namely, how? How will you publish your manuscript and make it available to those readers just waiting for it?
In today’s world, writers have several different options. You can seek a contract with a traditional publishing house, you can use a vanity or cooperative press, or you can self-publish. I examine the pros and cons of each method in my class “Four Roads Diverged,” and if you’re new to the publishing scene, then this could be a great resource for you as you consider all the options in full. In this article, I’m going to explain the two most popular (and legitimate) options, and then focus on self-publishing on Amazon’s KDP platform for Kindle and print books.
What’s in This Article?
What Is Self-Publishing vs. Traditional Publishing?
What is POD or Print-On-Demand Printing Publishing?
Preparing Your Manuscript for Self-Publishing
Technical Preparation of Your File in Microsoft Word
Creating a PDF for a Print Book
Recommended Margin Sizes for Print Books
How to Create an eBook in Amazon KDP
Bonus! What’s the difference between RGB and CMYK?
How to Create a Paperback Book in Amazon KDP
What Is Self-Publishing Vs. Traditional Publishing?
Most books you pick up in a bookstore or even order online are from traditional “big press” publishers. These are the publishing companies who have been publishing books for decades; they have a building, a staff that includes editors, designers, marketing, publicity, accountants, directors, and more, established relationships with retailers and readers, and endless experience. A contract with a big house is desirable for many reasons…but publishing slots are limited, and thanks to platforms like Amazon KDP and Ingram Spark/Lightning Source, authors are no longer limited to these houses.
Are you curious about what all those people do at the big publishing houses and agencies, how they work for you, and what responsibilities you’ll have to take onto your own shoulders if you self-publish? As someone who has worked with many different houses and agencies, who has fulfilled the role both of author and editor and done many of the other tasks in marketing and publicity as well, I offer a peek behind the curtains in my class “An Insider’s View of Publishing.”
What Is Print-on-Demand or POD Publishing?
“Indie publishing”—traditionally known as self-publishing—has opened up many more possibilities for authors with the technology known as Print On Demand or POD printing. Most large publishing houses use printing presses, which are very cost-efficient for large numbers of books…but most of us can’t afford to print or warehouse thousands of copies of our books. POD has changed that landscape.
What is POD or Print On Demand? It’s quite simply using laser printers to print a book one at a time, rather than using a printing press. This means a higher cost per book, but it allows you to print as few as one copy or as many as you please, without having to front the money for that press run or warehouse untold numbers of books. Many different companies now exist to help you with your POD needs. For the purposes of this article, I’ll touch on the two most popular, Ingram and Amazon KDP, and then walk you through the process at Amazon, for both print and eBook.
Should I Self-Publish?
This is a question no one can answer but you. Some things you should consider, however, are:
- Do I want to go through the process of finding an agent and then submitting to publishing houses?
- Will my book complement the existing lines of my target publishing house?
- Do I have a strong hook that will interest a big press?
- Do I have the money to invest in professional editing, cover design, and typesetting?
- Do I know how to reach my intended audience?
- Will I be able to dedicate the time it takes to make a book successful without the aid of staff?
If your strengths lean toward the last half of that list, then self-publishing could be a great option for you. It’s also great for people with a very targeted audience that they don’t care to expand, such as a large family, community group, or interest group. If you have a speaking platform and need books that you’ll be hand-selling, this could also be a slam-dunk for you.
So let’s say you’ve decided after much thought that you will self-publish. Now what?
Preparing Your Manuscript for Self-Publishing
The first and most important step in preparing your book for publication is getting it edited. I cannot stress enough how important this is. We as authors cannot and do not see all the flaws in our work, whether plot issues, repetitive information, grammatical errors, or typos. Professional eyes are key here.
And yes, I said professional. Your friend the English teacher or your mother, talented as they may be, are very rarely going to cut it. Why? Because they’re not educated in publishing industry standards. Your readers, however, will notice things that are “off” or “weird” or “wrong,” even if they don’t have the words to explain it. Hiring a professional editor with experience in the industry—especially with the type of book you’re publishing—will help you deliver to your readers a book that meets their expectations.
You can find lists of freelance editors here:
Once you’ve gotten your book edited, it’s time to prepare the file itself.
Technical Preparation of the File in Microsoft Word
In order to create a final file that is ready for publication, there are a few things you need to do to make sure your manuscript ends up looking right.
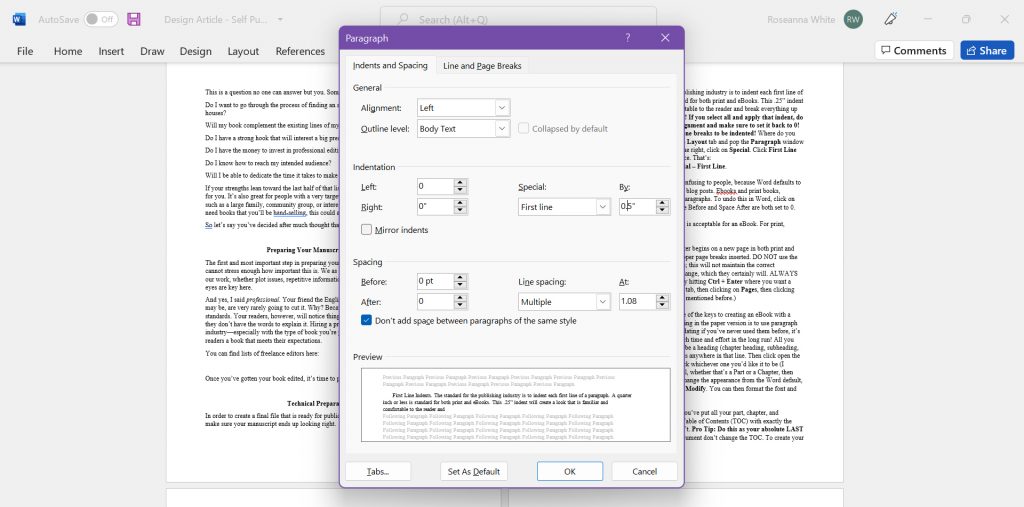
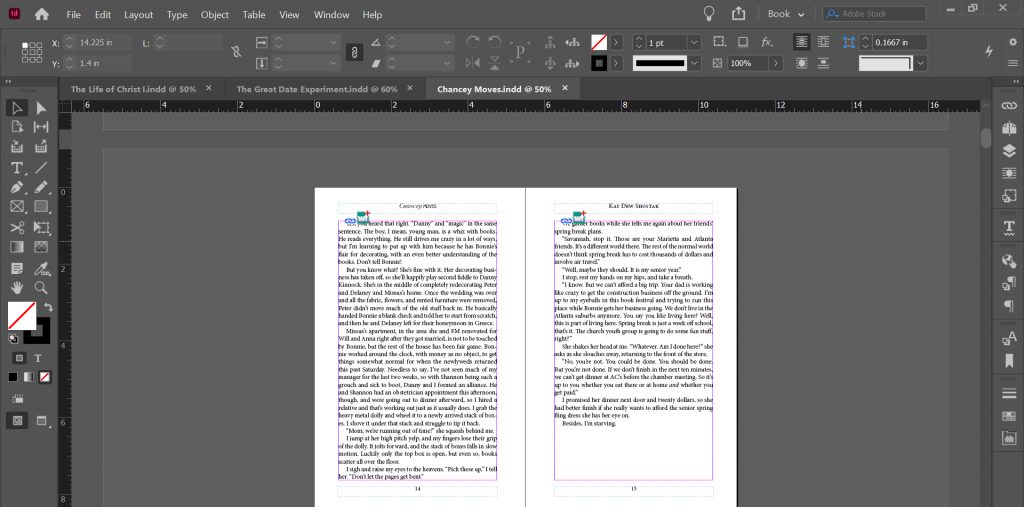
- First Line Indents. The standard for the publishing industry is to indent each first line of a paragraph. A quarter inch or less is standard for both print and eBooks. This .25” indent will create a look that is familiar and comfortable to the reader and break everything up nicely, providing good white space. Pro Tip! If you select all and apply that indent, do a search for anything with a Centered Alignment and make sure to set it back to 0! We don’t want our chapter headers or scene breaks to be indented! Where do you find this feature in Word? If you click on the Layout tab and pop the Paragraph window out, you’ll fin the Indentation section. On the right, click on Special. Click First Line and then input .25 into the measurement space. That’s:
Layout – Paragraph – Indentation – Special – First Line. - Space Between Paragraphs. This can be confusing to people, because Word defaults to putting space between each paragraph, as do blog posts. Ebooks and print books, however, should NOT have space between paragraphs. To undo this in Word, click on the Layout tab and then make sure the Space Before and Space After are both set to 0. (You can also adjust this in the pop-out Paragraph window, shown above for the Indent section.)
- Alignment. Either left or justified alignment is acceptable for an eBook. For print, justified alignment is preferable.
- Page Breaks. To ensure that each new chapter begins on a new page in both print and eBooks, you have to make sure you have proper page breaks inserted. DO NOT use the Enter key to manually move to the next page; this will not maintain the correct appearance if things like font or page size change, which they certainly will. ALWAYS use the Page Break feature in Word, either by hitting Ctrl + Enter where you want a break to be placed, or by going to the Insert tab, then clicking on Pages, then clicking Page Break. (This is the same as the hotkey mentioned before.)
- Using Paragraph Styles for Headings. One of the keys to creating an eBook with a linked table of contents AND to quicker styling in the paper version is to use paragraph style formatting. While this can seem intimidating if you’ve never used them before, it’s actually super easy and will save you so much time and effort in the long run! All you have to do is make sure the text you want to be a heading (chapter heading, subheading, etc.) is on a line by itself. Place your cursor is anywhere in that line. Then click open the Home tab, open the Styles dialogue, and click whichever one you’d like it to be (I recommend using Heading 1 for the top level, whether that’s a Part or a Chapter, then Heading 2 for the next one, and so on.) To change the appearance from the Word default, right click on that style in the tab and select Modify. You can then format the font and spacing to your liking.
- Create a linked Table of Contents. Once you’ve put all your part, chapter, and subheadings in a Style, it’s easy to create a Table of Contents (TOC) with exactly the information you want and none that you don’t. Pro Tip: Do this as your absolute LAST step, so that any tweaks you make to the document don’t change the TOC. To create your TOC, go to whichever page in the document you’d like it to be on (I recommend after you copyright page but before any dedications or author’s note). Be sure to create a separate page for this. Once your cursor is on the page you want the Table of Contents to appear on, click the References tab. All the way to the left you’ll see a Table of Contents button. Pop that out and select Custom Table of Contents. This will open a new window that will allow you to customize your TOC. Select however many levels you want to appear (you can choose, for example, whether to list subheadings or not). For eBooks, UNCHECK the page numbers option. Pages will be fluid in an eBook, so no numbers are required. If you’re using a Word doc for your final print version and want a table of contents in there (usually only used for non-fiction or chapter books for kids with titled chapters), then keep the page number option checked. Set the fonts and spacing how you want through the Modify option. Once it looks how you want it to, click Okay, and the TOC will appear!
- Extra Spaces. I recommend doing a search for are extra spaces. These are especially bothersome at the beginning and ending of your paragraphs. First do a search for two spaces together and Replace All with 1 space. (Many of us learned to put 2 spaces between sentences, but this is no longer the accepted form. Replace all of these with a single space for consistency.) Then search for a paragraph break followed by a space. The code for a paragraph break is ^p. Use that with a space afterward for your “Find” and just the code, no space, for your “Replace.” You can do the same thing, only with the space before the ^p to find stray spaces at the ends of sentences (these will occasionally force unneeded line or page breaks).
This may seem like a lot of work, but once you know how to format a file, it’s something you can do from the start as you’re writing. Plus, if you just really don’t want to deal with the technical side of things, there are many companies that will handle your eBook and print formatting. Check out my Typesetting services for print formatting; eBook formatting can be added starting at $50 extra.
Generating an eBook
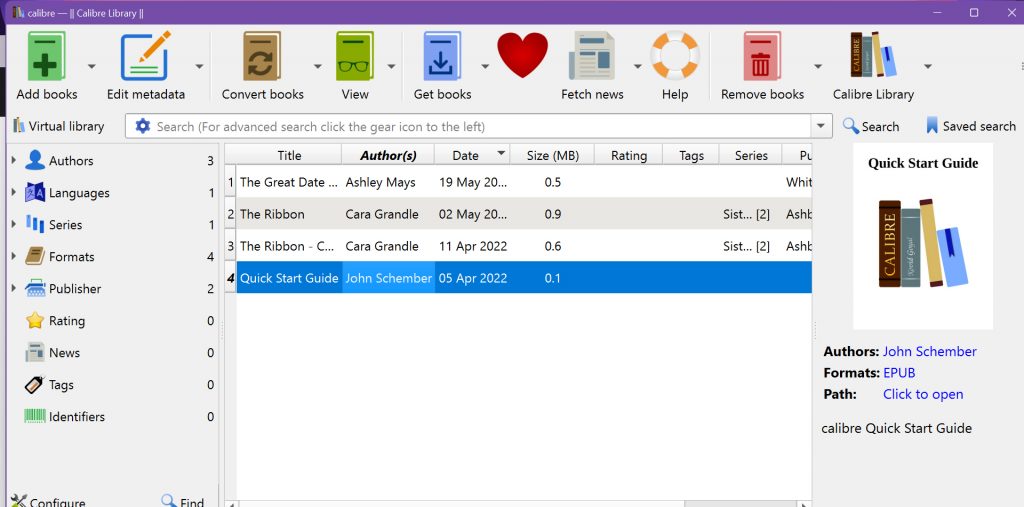
From this base Word doc, you can now generate any eBook files you’d like. I recommend Calibre, a free downloadable program, which will allow you to create files in multiple formats, including epub, mobi, PDF, and many more. NOTE: Amazon will strip the formatting from any of these files when you upload an eBook, so there’s no point in using fancy fonts. They won’t make it to the screen.
As of summer 2022, mobi files will no longer be readable by Amazon devices, so epubs are where your effort should be. NOTE: Ingram does not accept epub 2.0 files; you will need an epub 3.0 file if you use Ingram to distribute eBooks, which are best generated through Adobe InDesign.
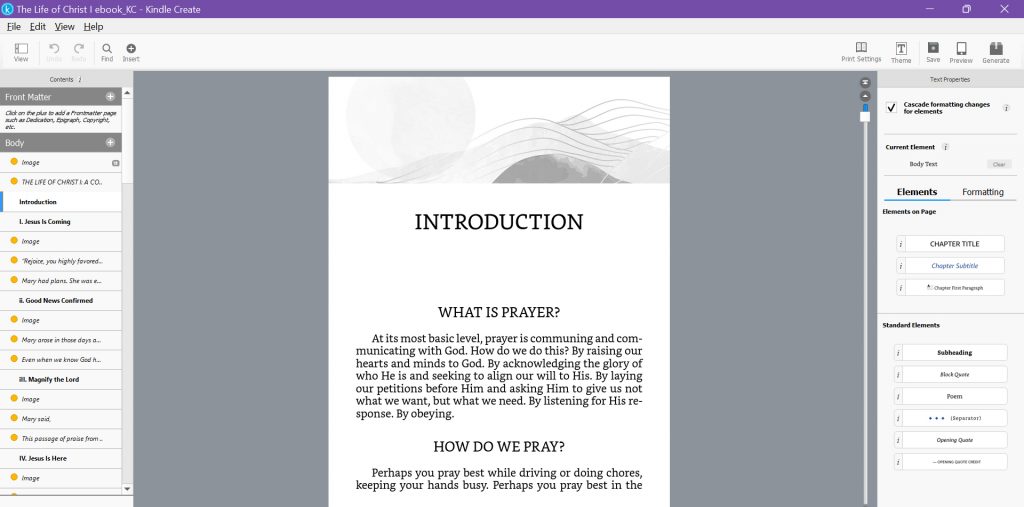
For files for Amazon devices, Amazon is now recommending you use a free downloadable program called Kindle Create. This is a very user-friendly, easy-to-navigate piece of software that gives you wider options for customization than Amazon will allow through a regular epub or Word doc. I consider it highly worth the time it will take you to download and learn.
Note: if you’re using Smashwords, they have very specific requirements for your files, especially the TOC.
Creating a PDF for a Print Book
In order to create your print book, I highly recommend you contact someone with experience in typesetting. They have the experience that will answer the questions about margin sizes, font sizes, line spacing, and so much more. Professional typesetters will most often use Adobe InDesign, the industry standard which allows for customization of absolutely everything. It by far creates the most professional-looking file, but the program is expensive and has a steep learning curve. If you want a book that looks just like a book from a big publisher, hire a typesetter who uses InDesign. Check out my Typesetting services if you’re interested in this.
However, plenty of people do it on their own. There are many pieces of software that will facilitate this; which one is best depends largely on whether you’re using a Windows or Apple device. Some people also use Word.
For any of these options, the thing to remember is that the page you create on the screen is exactly what your printed page will look like. Unlike with an eBook, where each reader can choose their own font size and more, YOU are the only one who decides how your PDF will look. You have to create running heads, put page numbers on, set your inner and outer margins (these should be different! You need a wider interior/inside margin to allow for the binding), decide on fonts, line spacing, take care of widows and orphans (in the text, though literally is always a good idea too, ha ha), and the like.
Recommended Margin Sizes for Print Books
After much trial and error and many printed and bound proofs, I’ve landed on my favorite margin sizes. These allow comfortable viewing of the page without looking too roomy, and also allow for title and author name at the top of the page. If you don’t want those running heads (where the title and author name go), you can use a smaller top margin. The ideal bottom margin depends on whether you have page numbers on the bottom. Outside margins look fine at the smaller number given below, but if you want something roomier, nudge it up. DO NOT skimp on the inside margin! If a reader can’t see the end of the line because of the binding or find it uncomfortable to hold the book open enough to allow it, they’re more likely to put the book down.
Inside Margin: 0.875 – 1”
Outside Margin: 0.625 – 0.75”
Top Margin: 0.75 – 0.875”
Bottom Margin: 0.625 – 0.75”
Amazon KDP Vs. Ingram
Now you have a manuscript document ready for publication…but which platform do you use? There are many companies who will help you distribute your books (Draft2Digital, Smashwords, and more), but we’re going to focus here on the best options that include both print and eBook and which keep the most money in your hands: Amazon KDP (Kindle Direct Publishing) and Ingram.
Amazon KDP is the combined Amazon platform for self-publishing eBooks, paperbacks, hardcovers, and Vella episodes. Using Amazon’s platform gives you the best possible rates on Amazon sales, which is where most authors find the majority of their income comes from. In the section below, I’ll walk you through how to set up your KDP and upload your files.
Ingram, on the other hand, is the world’s largest book distributor—nearly every bookstore has an account with Ingram. So if your goal is to be available to stores and retailers, you need an option other than Amazon. (Though Amazon offers wider distribution, stores are very unlikely to order from them.) Ingram, however, charges setup fees, revision fees, and keeps a standard 15% of your sales. (Note that Amazon does also keep a percentage, depending on the channel of distribution.)
In terms of quality, the two are very similar, though Ingram now offers some finishes and paper types, like groundwood, that Amazon does not. It’s also worth noting that Ingram will generate a cover template specific to your EXACT page count, whereas Amazon generates templates for every 10 pages. This means that books printed with Amazon may have a lot of blank pages inserted at the end to fill out the count for that template.
Pro Tip: Binding a book is a physical process, which means there will be inconsistencies and margins of error. Do not expect your spine to line up perfectly on every copy. This will come up no matter which printer you use.
Many independent, self-published authors (often called “indie authors” today) choose to use BOTH platforms; Ingram for the expanded distribution and Amazon for Amazon distribution. This maximizes the profits from Amazon but also caters to other booksellers and retailers.
How to Publish on Amazon KDP
Amazon now runs their platform for eBooks, paperbacks, hardbacks, and Vella episodes all from the same dashboard. This is especially handy for us because it means we don’t have to input the same details for a title over and over again for each edition. We can enter things like title, author name, back cover copy, categories, and keywords on only the FIRST version we create, and it will copy automatically to any subsequent copies.
You create your Amazon KDP account with your regular Amazon login at https://kdp.amazon.com. If you do NOT want to use your personal login, you’ll have to create a brand-new account and input whatever credit card and address etc. you want associated with your KDP account. Once you’ve logged in, you’ll see this screen:
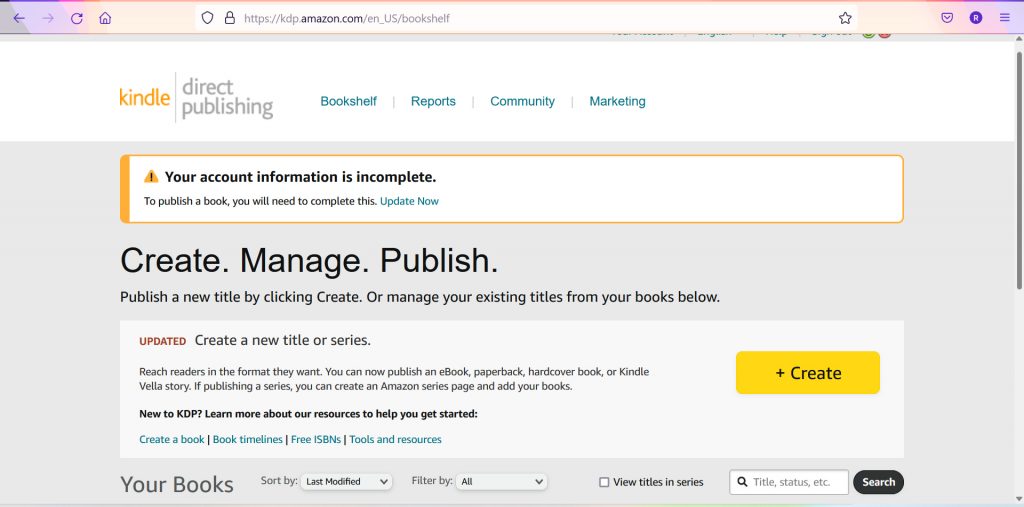
To set up your account to receive payments from KDP, click that “Update Now” link at the top to complete your account setup. Amazon guides you through these steps, so I won’t walk you through them now. Just be armed with things like the information for the bank account you want your payments to go to.
Once you’ve set up your account, you’re ready to create your first title! Start by clicking that big yellow CREATE button. You’ll then be asked to select which edition you’d like to create first.
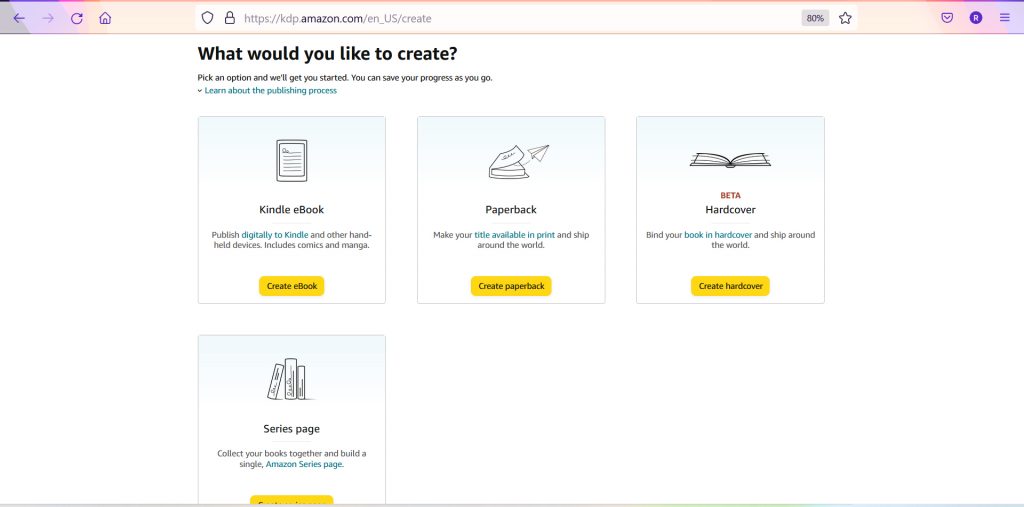
Let’s start with eBook creation, since that’s first in the line. Click that button and let’s get started!
How to Create an eBook in Amazon KDP
Kindle eBook Details
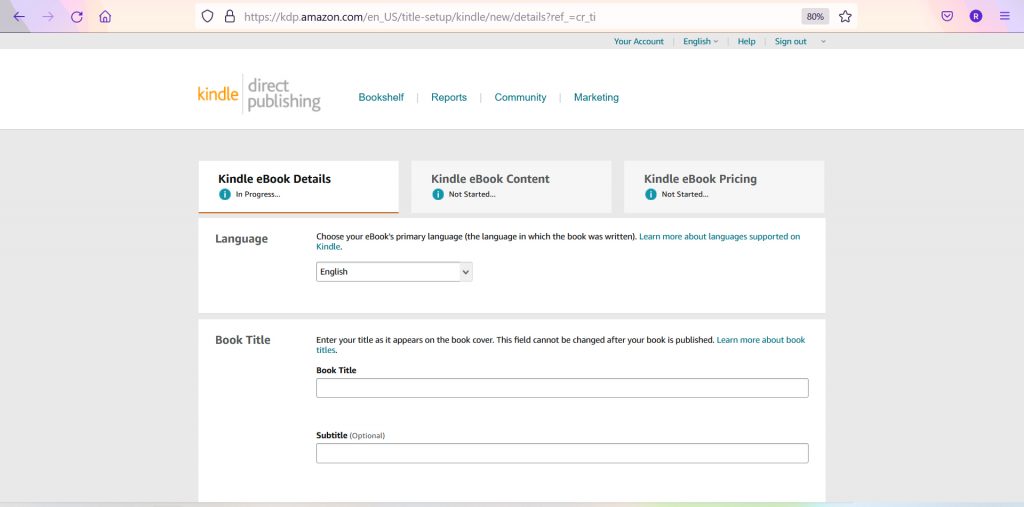
Once you’ve selected the eBook option, you’ll be delivered to this screen. As you can see, you simply type in your book’s information. Things get a little bit more complicated as you scroll down though. Let’s take a look at the next section.
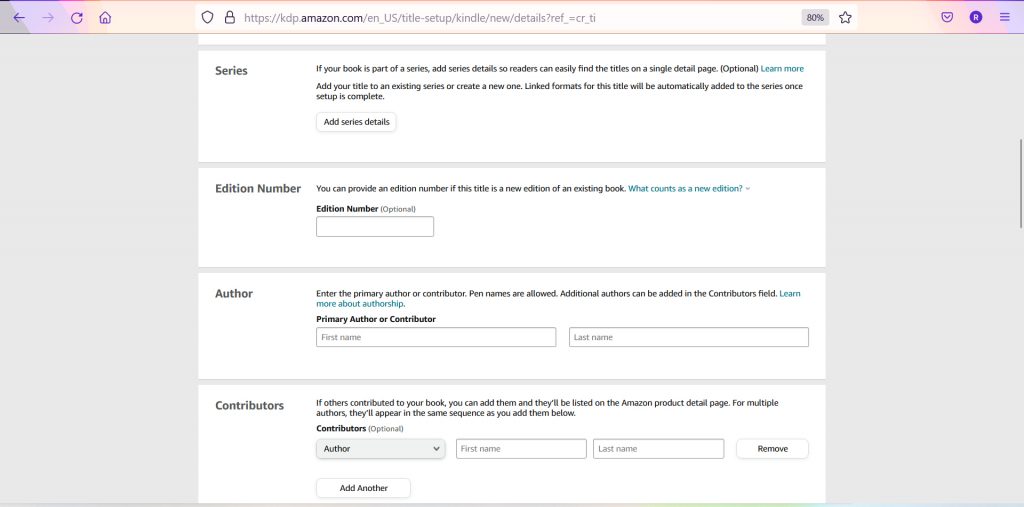
As you scroll down, you’ll see a place for Series Information. If your book is NOT part of a series, just ignore that completely. If, however, it IS part of a series, this is a fun feature that you can set up either at this point in the process or which you could have done it beforehand (see that bottom button of the final image in the previous section).
If you click that white “Add Series Details” button, you’ll be delivered to this screen.
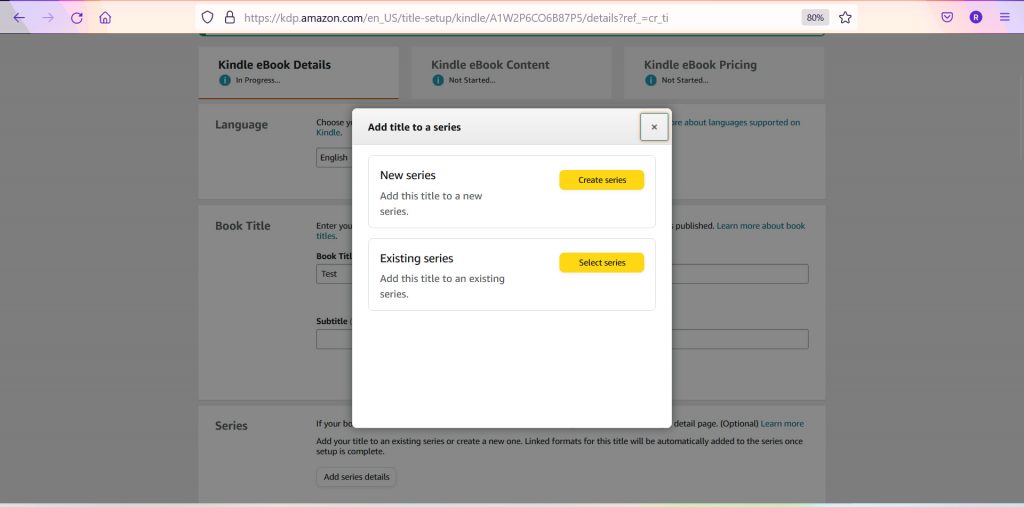
If this is the first title you’ve ever added to KDP, you’ll probably be selecting the “New Series” option; however, once any other books in the series are in Amazon, you can click the “Existing Series” button instead and select from the list of series you’ve already created. Let’s click on “Create New Series.”
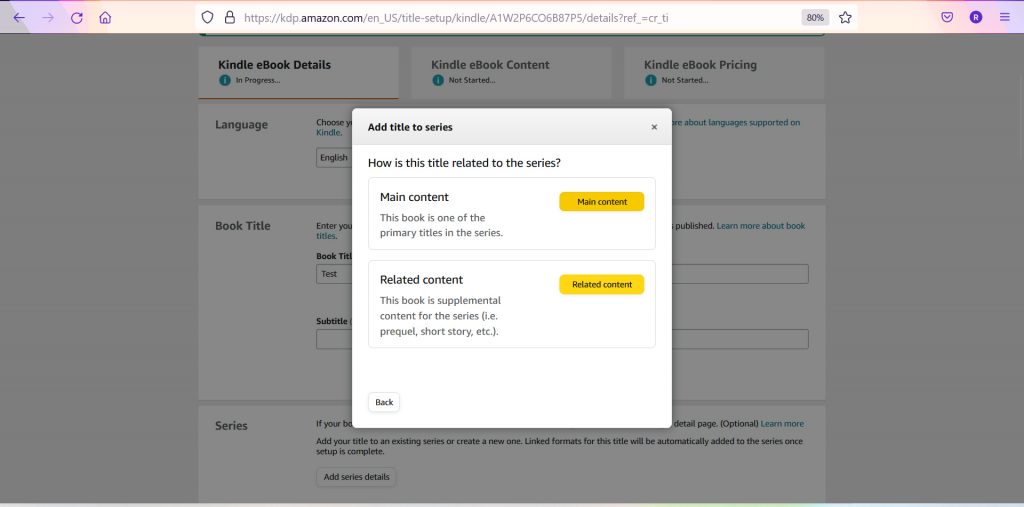
This next screen asks you to choose whether you’re uploading main content for your series—one of the primary titles—or “related content” like bonuses, shorts, prequel novellas that readers don’t need for the series, and so on. Select whichever is true for your content. I’m going to click “main content.”
You’ll then see this screen:
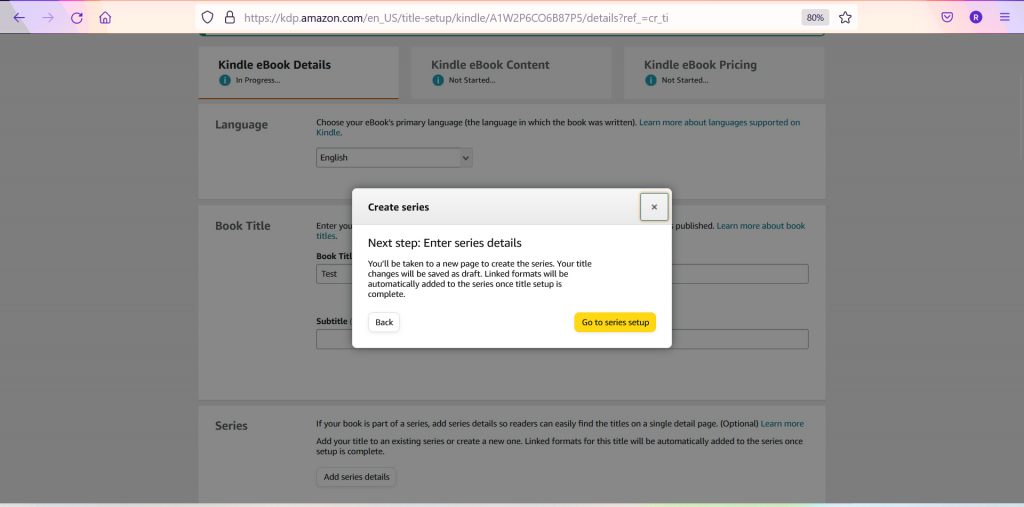
When you click that yellow “Go to series setup” button, it will take you to a page that is identical to where you’d have gone had you selected “Series Page” from the “What Would You Like to Create?” screen above. Here’s what it looks like:
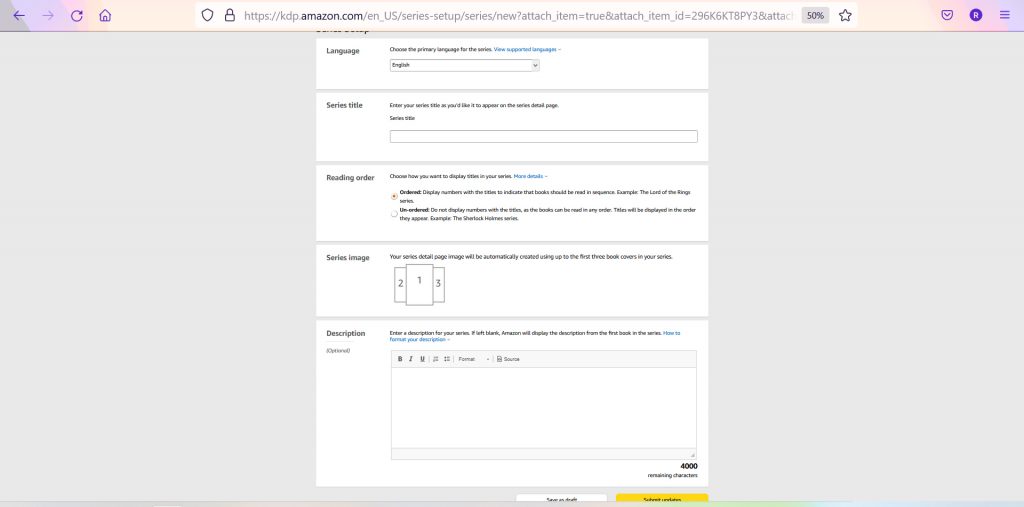
This is where you tell them what your series is called, whether the books in the series need to be read in order or can be read in any order, and you can even give a short description of the series itself—an option that I think is a fun advantage to their new series setup, and which didn’t use to be available! Just put in all your series details and then click that yellow “Submit” button at the bottom right. It will then deliver you back to the eBook creation page.
The next items for you to fill out about your ebook are Edition Number, Author, Contributors, and your back cover copy in the Description section.
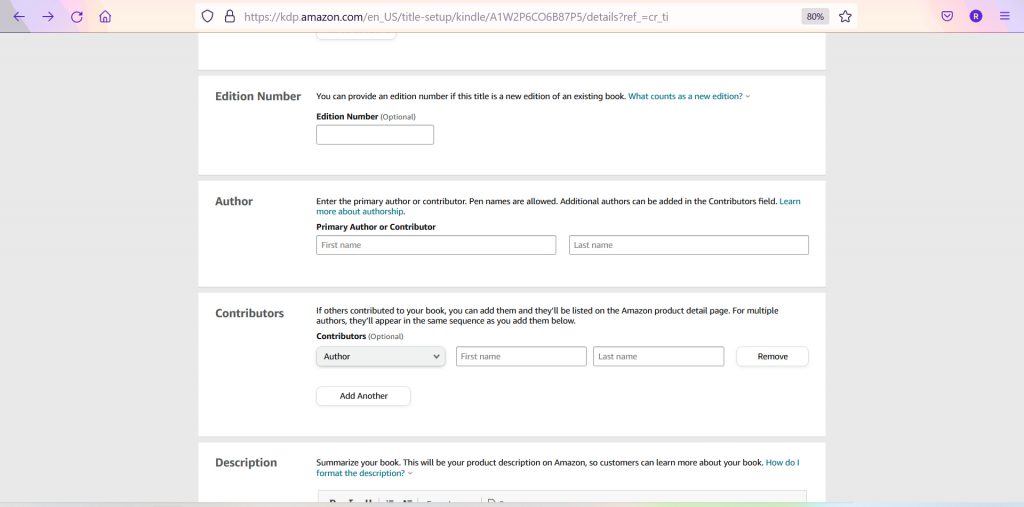
NOTE: If your book has been previously published and you are putting it back up after getting your rights back, mark it as “second edition.” Also be aware that if your book already exists in Amazon under that first edition, they will most likely email you asking to prove that you have the rights to put it up again. Be prepared with a letter of rights reversion.
Your name is obviously the one that goes into the “Author” lines.
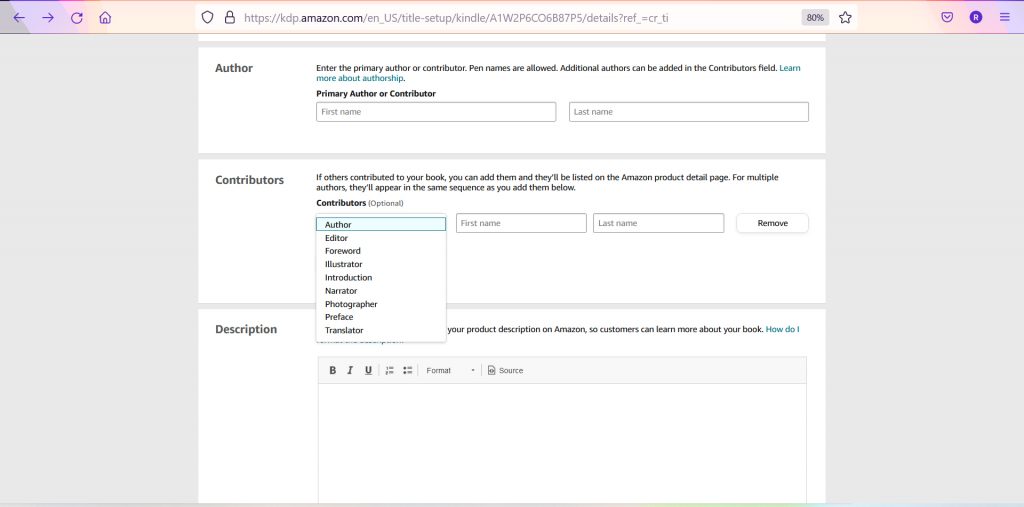
“Contributor” is reserved for projects with multiple authors, or when you want to list and give credit to another person who has worked on the project as well (usually reserved for those with significant contributions, not the freelance editor you hired. “Editor” here usually indicates someone who helped compile a book.) Here are the options available:
Okay, let’s move on! Next up, KDP will ask you to verify your publishing rights. If this is your original work, keep that top option selected. If, however, you’re doing a reprint of a book now in the public domain, indicate that here.
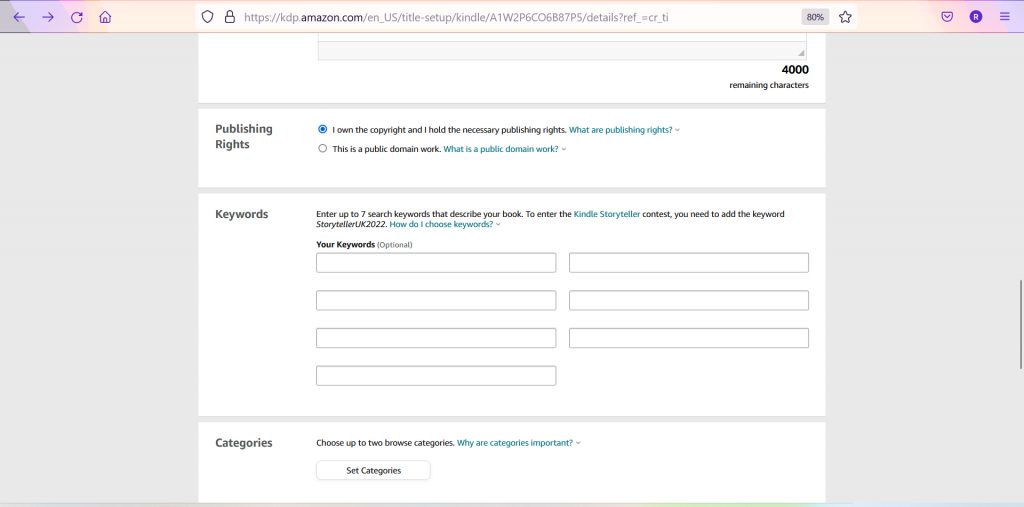
Next up is KEYWORDS. Keywords are critical to your book actually popping up in search results, so give it some though! This is not the place for entering your genre category, but rather to mention the specifics about your book. For instance, your genre category may be “historical romance” but this is where you’d enter things like “Regency, London, marriage of convenience,” and so on. List one word or phrase in each space.
Then come the categories. Note: Amazon’s official categories in KDP do NOT match the “bestseller categories” displayed on your product page! If you scroll through the list they give expecting to drill down as far as their lists do, you will be eternally frustrated. In the actual category list, you are confined to rather standard, broad categories. It’s the keyword search terms that will lead to those lists. Note: After your book is published, you can email KDP to ask them to add your book to more specific bestseller categories.
There’s no way I can show you ALL the categories available in a single screenshot, but here’s what the first screen looks like.
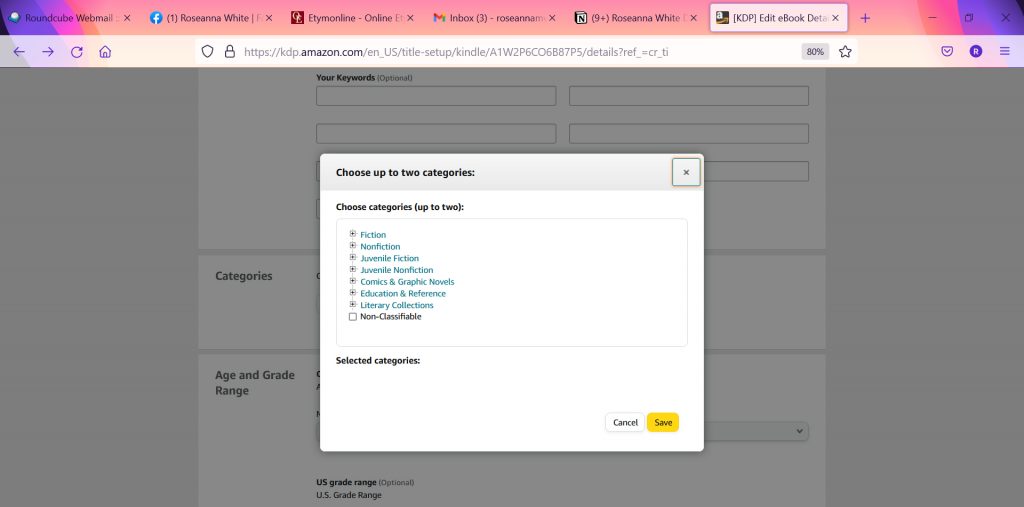
Click open those general categories to see the subcategories in each one. You can select UP TO TWO in this window, so pick the ones that best match your content.
Once you’ve set your categories (you can change these at any time!), you’ll be ready for the last couple steps on this eBook Details page: Age and Grade Range and Pre-order.
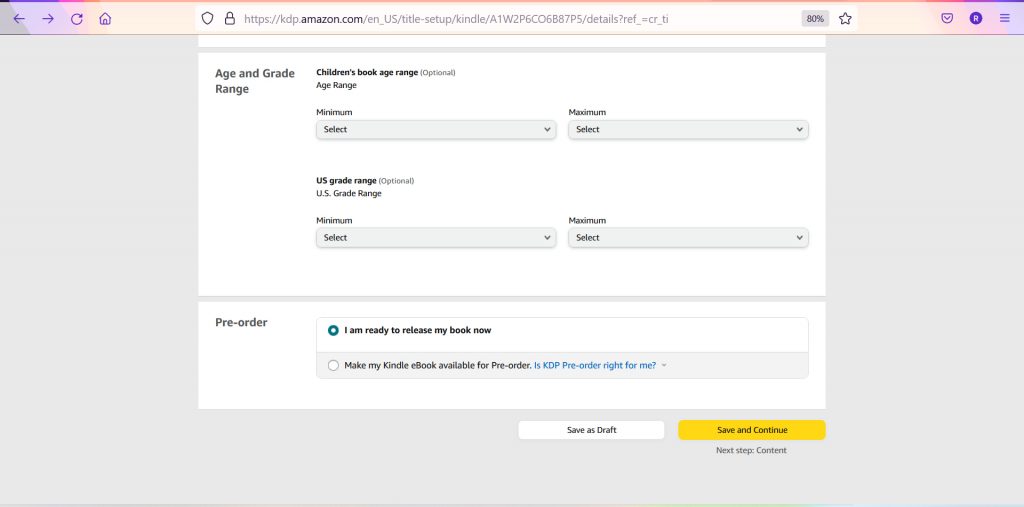
If your book is for the general adult market, just skip right over the Age and Grade Range section. That is SOLELY for juvenile/young adult books. If you have indeed written something for young readers, enter in whatever ages and grades are appropriate.
Then you get to tell Amazon whether this book will be ready to go as soon as you hit the Publish button, or if you’d like to set up a pre-order. Note: Pre-order is ONLY available at this time for eBooks. Note: If you do not submit your final files in time, you will lose the privilege of using the pre-order function.
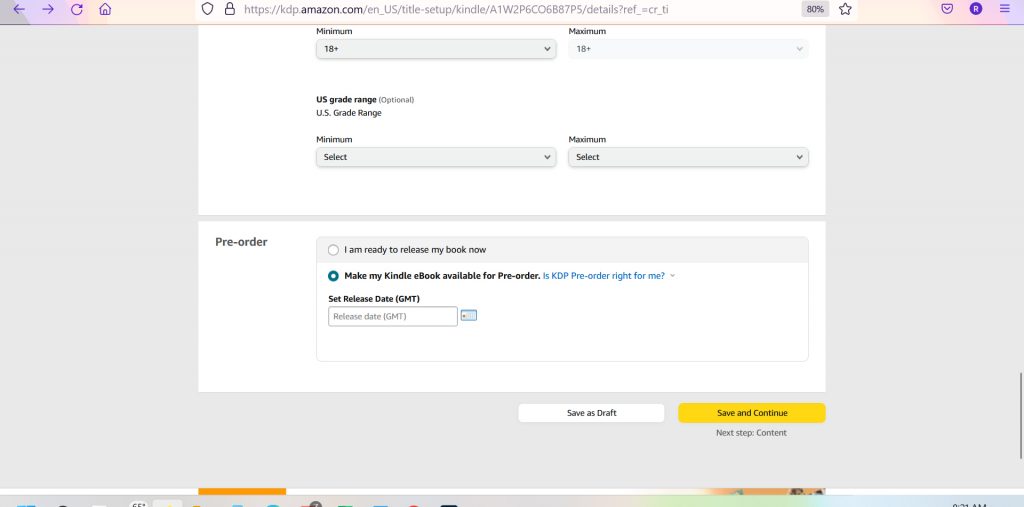
If you’re setting up for pre-order, you’ll see this appear:
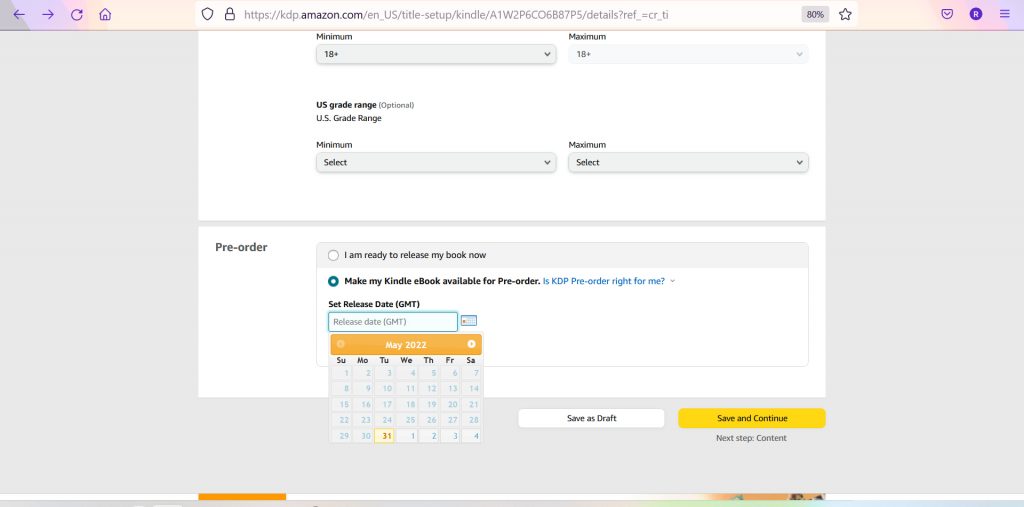
If you click into the space, a calendar will pop up. You can schedule your pre-order up to a year in advance.
Congratulations! You’re now finished the first part of setup. Press that yellow “Save and Continue” button to move onto the Content screen!
Kindle eBook Content
Now it’s time to upload your files! When you “Save and Continue” from the Details page, you’ll be delivered here.

The first question it asks you is about Digital Rights Management. This is the encryption that you can put in your file or not. There are many opinions on whether this is a good idea or not; click the hyperlinks they provide to read up on it.
Below that you’ll see a place to tell Amazon KDP if you have your files ready for upload, in the even that you selected “pre-order.” You’ll also see a very large, bold line telling you the final day and time for uploading your files. If you have them ready, go ahead and click “Yes, I have a file…” and upload them so you don’t forget. If, however, you don’t have those files yet, click the “No. I’ll upload later…” option and make yourself a note to get the files in there by the deadline.
If you click “Yes,” then you’ll see this:
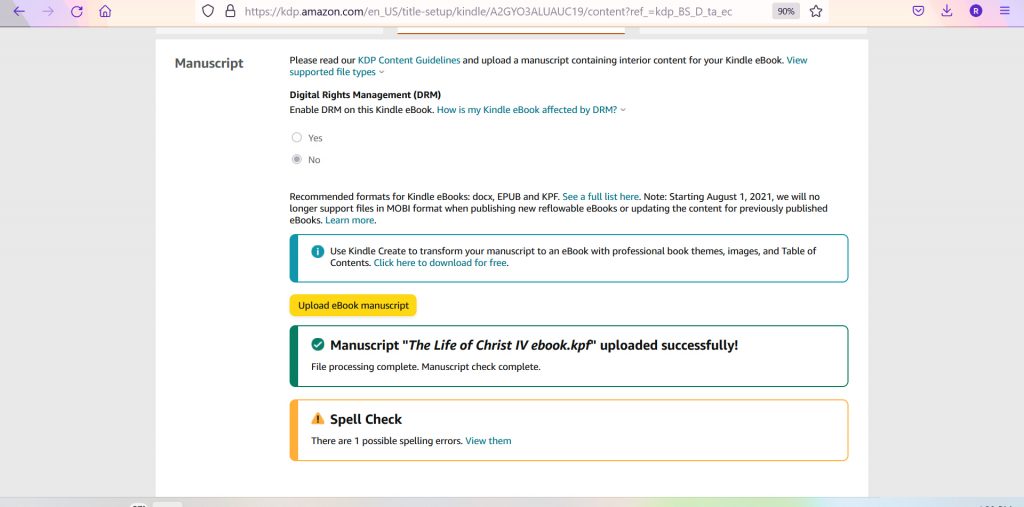
Click that yellow Upload button, and you’ll be able to browse through your computer to where you’ve saved your file. If you used KindleCreate, then upload the .kpf file (icon is a box). It will also accept an epub or a Word document. Once you’ve uploaded, it will tell you the file has processed successfully and will also do a Spell Check. (Click the “View them” link to see what they flagged; sometimes they catch real things, often it’s proper nouns or foreign words that are unrecognized, in which case you can tell the system to ignore those.)
The next section is for adding your cover and cover files.
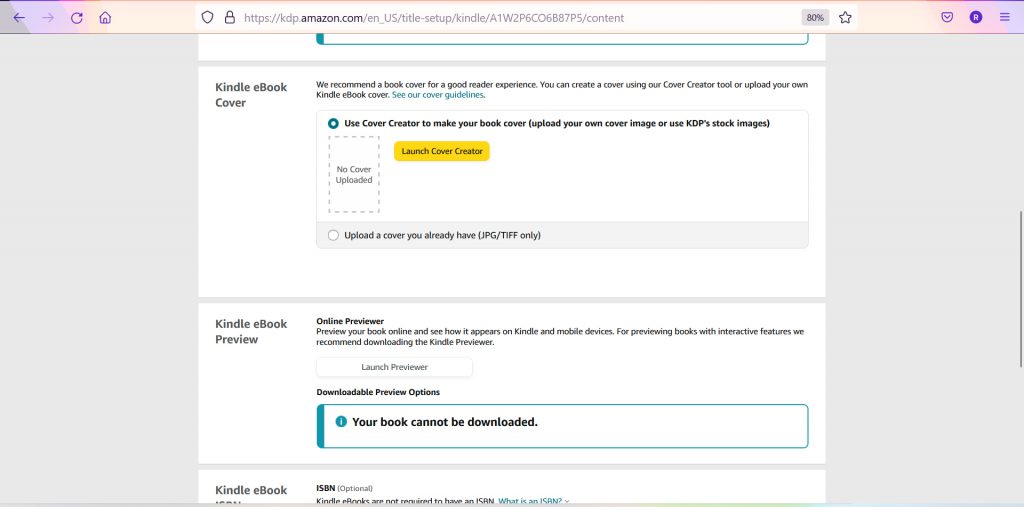
Note that the default selection on the Cover section is “launch cover creator.” Chances are you already have your cover (highly recommended!), so instead of that option, click “Upload a cover your already have.” The “Launch Cover Creator” option will take you away from this screen, to a place where you (you guessed it!) create a cover right there in the app. Not exactly recommended for a professional look, so be certain you’ve already had a professional cover design done.
Clicking that will pop up a very simple “Upload Your Cover File” yellow button. Amazon KDP only accepts jpeg or tiff formats for an eBook cover. Minimum dimensions allowed for your cover are 1000 pixels in height and 625 pixels in width. Cover image should not exceed 10,000 pixels in height and in width. Make sure you’re submitting a file that is at least 300 dpi in resolution and saved in the RGB color space. (Your cover designer will make sure all these specs are met!)
Bonus! What’s the difference between RGB and CMYK?
As a designer, I tend to toss these initials around a lot, but authors never know what I’m talking about. I get that—I didn’t always know what it was either! In short:
RGB = colors for your backlit screen
CMYK = ink colors
Why is it important to have your file saves in the right color space? Because light and ink display some colors VERY differently, especially blues. What looks like a great royal blue on your screen will often print more purple. Universally, colors tend to print darker than they look on your computer. On the other hand, files saved in CMYK will often show up strangely, unnaturally bright and nearly neon on the screen. Saving your file in the correct color space will make sure the end product turns out like you want it to.
Now, back to our regularly scheduled tutorial…
To preview your files in the Preview section, click the “Launch Previewer” button. This will take you to a new screen where your book will show up in a Kindle device.
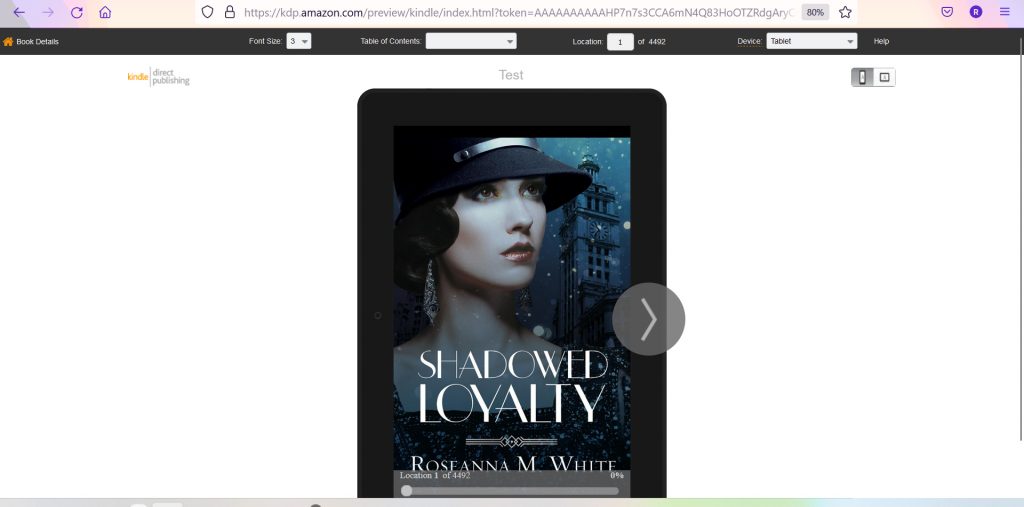
To advance through the eBook, just click that arrow that appears when you move your mouse over the image. You’ll be able to go forward, backward, or even select a location based on the Table of Contents or Location up at the top. Go through the document and make certain everything appears like you want it to.
Once you’re finished, click the small Book Details button up in the top left corner. This is the only way to return to the previous screen! Do NOT navigate back with the back arrow in your browser!
All About ISBNs
The final section on the Content page is for the ISBN. This is the unique identifier assigned to each book. While eBooks do not require an ISBN, they are still generally recommended. If you are publishing your book on other platforms, definitely assign one that you have purchased yourself through Bowker’s MyIdentifiers website.
When you go to the official MyIdentifiers site run by Bowker, you’ll have the option for purchasing a single ISBN or various bundles. If you intend to publish more than one book, the bundles quickly become far more cost effective than buying single ISBNs.
Pro Tip! Bowker will try to sell you a barcode as well. You do NOT need to purchase this! Barcodes are generated from the ISBN and can either be created for free from many websites or you can let the printer add it to your book. A barcode is not needed for an ebook at all.
You also have the option of allowing Amazon to assign one of their ISBNs to your books. This will ONLY work if you publish ONLY on Amazon, and they themselves do not recommend it, as it means that they technically own the right to publish the work instead of you. Not what any author wants! Though an ISBN is an investment, it is worthwhile to retain all your own rights.
For an ebook, I recommend either purchasing a dedicated ISBN for all digital file types across all platforms or opting not to assign one at all.
You also have the option of listing a publisher or imprint. Most indie authors come up with a name for their “press” so that this field doesn’t just read “Amazon Publishing Services” on the final product page. No one wants their product to scream “self-published!” after all. Come up with a name that has some meaning for you and use that as your publisher.
Now you’re ready for the final part! Click that yellow “Save and Continue” button again, and you’ll go to the Pricing section.
Kindle eBook Pricing
The final section in setting up your eBook is the Pricing section.
At the top of the page, you’ll see a section about KDP Select. This is a program that gives you special benefits if you promise to sell on Amazon only for a set period of time. You can read their terms and conditions by clicking on the hyperlink.
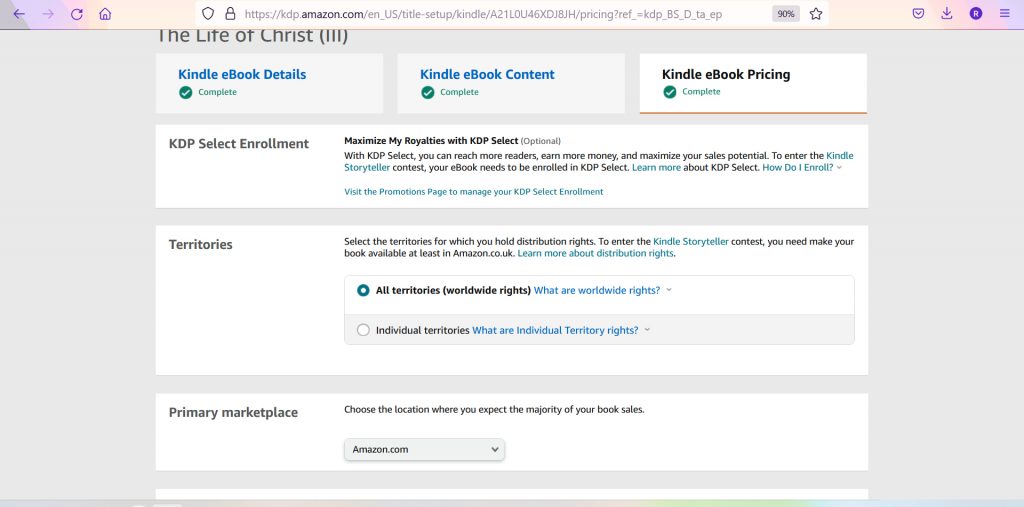
Is KDP Select worth it? That’s a question for a whole other article, and one with many different opinions. In short: it can work well for an indie author. But it depends entirely upon where YOUR audience shops. Just note that this is a decision that cannot be immediately undone. If you change your mind, you can pull them out, but there’s a set period of time that it MUST stay in the program.
Next we move onto Territories. Chances are that you want your book to be available worldwide, so leave that default All Territories option selected.
Next, choose the primary location, which is the Amazon marketplace where you expect most of your book sales to come from. It defaults to the primary Amazon.com but includes many others.
Then scroll down and you’ll get to the actual pricing.
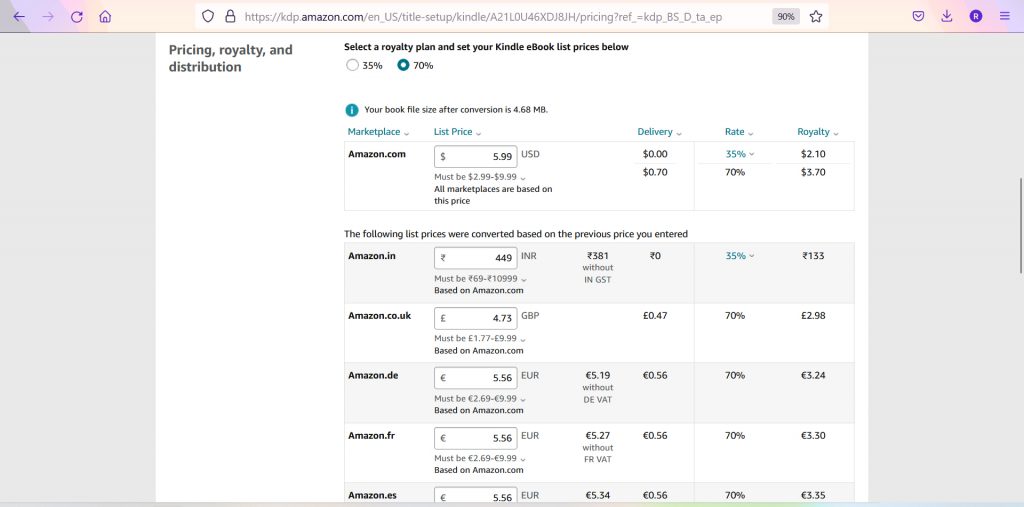
As you can see in this screenshot, Amazon gives you two choices for royalties, 35% and 70%. Why would you ever choose 35%? Well, that’s the only option for certain price-points. You have to set a minimum price of $2.99 to be eligible for the 70%. (It will still give you the lower option for higher prices, but…why?)
Here you also see that, if you’ve uploaded your final file, it will tell you your file size. This is important, because delivery fees (Amazon serving this file of yours to the readers who purchase it) are based on file size. If you have an image-heavy book, the size will grow, and the fees will go up. This affects your final royalty, so it’s something to consider. In the file I uploaded for this screenshot, there are indeed some images in each chapter, which means that I have a fairly high delivery fee here of $0.70. A regular novel that has no images or even a few small images for scene breaks will average under $0.10 for a delivery fee.
You can simply enter your price in that first field, and when you tab or click out of it, it will automatically generate the fees, your royalty rates, and the prices for the other territories (you can always change those territory prices manually).
Keep scrolling down, and you’ll see the end of the setup screen.
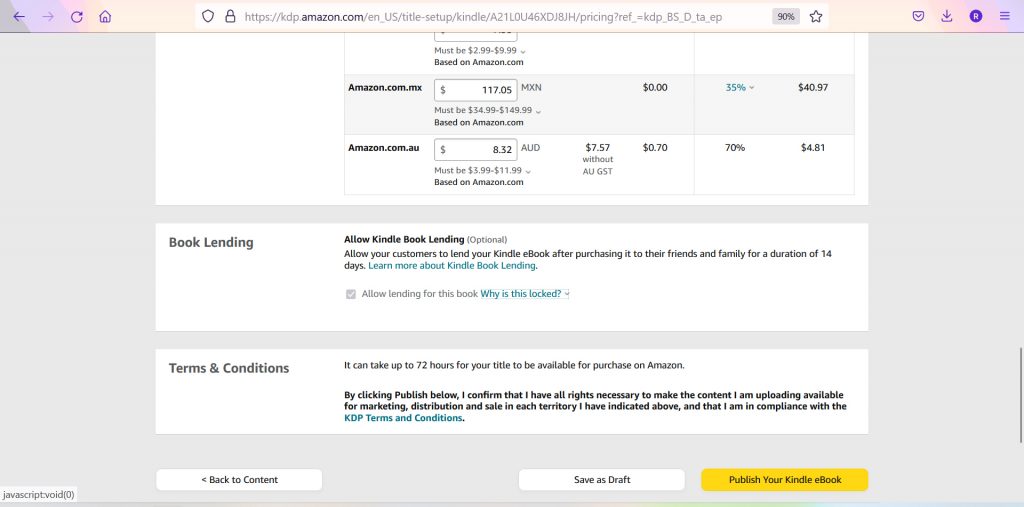
Book Lending is next; this is locked as an opt-in if you select 75% royalties, as part of the Amazon system of perks to readers. This allows a reader to lend an eBook file they’ve purchased to a friend’s Kindle device for 14-days…kind of like we all do with paperback books now and then. If you want to learn more about this program, click the hyperlink.
Otherwise, the final section is just letting you know that there’s some processing time and gives you the link to the Terms and Conditions. If you’ve never published on Amazon KDP before, do take the time to click on that and give it a read.
Once you’ve read the terms, that’s it! You’ve completed the setup of your eBook! All you have to do is click the yellow button, which will either say “Publishing Your Kindle eBook” or “Submit for Pre-order,” depending on which option you’d selected before. Once you click that button, your file enters the review process!
This does mean that it’s locked for the duration of the review. You cannot make ANY changes to your book or its information while it’s in the review process. If you’re setting up a pre-order, it will tell you when the “lock” date is. You’ll be able to make changes up until 72 hours before the book goes live, then it will be locked for review.
How to Create a Paperback Book in Amazon KDP
Once upon a time, Amazon’s print service was known as CreateSpace. However, several years ago they rolled everything under their KDP banner, which streamlines and simplifies the process for authors.
One thing you’ll quickly come to love is that each book you create has the options for multiple formats under the same listing. This is a view of the KDP dashboard after a draft of a book has been started (in this case, I created a “test” eBook for our purposes here).
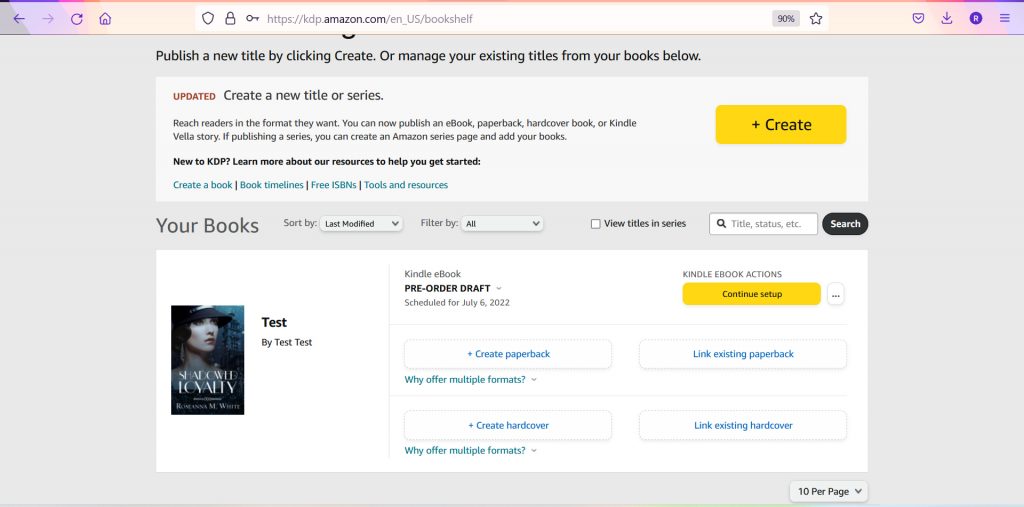
As you can see, that Test now displays my cover image and shows the eBook as a pre-order draft. Had I actually submitted a file, it would show it as in review or live. And now, under the eBook listing, we see a couple buttons.
You can either Create or Link an Existing version for both paperback and hardcover.
These two options are exactly the same in terms of the screens and options you’ll encounter in the following steps. The only difference is the cover file you’ll need—the hardcovers have much larger covers in order to account for the wrap. (At this time, Amazon KDP does not offer hardcovers with dust jackets; they only offer case laminate covers, which is a printed cover that will look like your paperback cover, but wrapped around the heavy stock.)
If you have already created an ebook, just go ahead and click that “Create a…” button for whichever version you’re doing next. I’ll do paperback here. It will deliver you to the Book Details page, which is EXACTLY the same as it was in the eBook screen.
KDP Paperback Details
If this is the first version you’re uploading, CLICK HERE to read about the setting up your Book Details, which are the same for all versions of your book.
If you’ve already created your eBook, then this entire page is already filled in for you! You can change anything, if you want slight variations for some reason, and do double-check the categories and keywords—occasionally I’ve found that, for some reason, those selections hadn’t copied over from my previous version, though most of the time they will. Assuming all appears as it should, you can scroll all the way to the bottom and click your lovely yellow button to Save and Continue, which will advance you to the Content screen. This is where you’ll encounter new information for print versus eBook editions.
KDP Paperback Content
The first part of the paperback content screen is about ISBN. CLICK HERE to read the section about ISBNs if you haven’t already. Unlike with an eBook, an ISBN isn’t optional for a paperback or hardcover version of a book; they must have in order to be published.
The default option is to use one of Amazon’s ISBNs, but as stated above, this isn’t recommended, even by Amazon itself. Better is to purchase your own and then click the “Use my own ISBN” button. When you click on that option, you’ll see the fields for entering your ISBN and an Imprint name.

Note: An imprint is not optional for a paperback like it is for an eBook. You MUST put something into this field.
Next you’ll see the section for Publication Date and then your Print Options.

Much to the dismay of every author ever, Amazon KDP does not currently allow pre-order options for print books (feel free to send them a message requesting this option be added! If enough of us request it, perhaps they’ll make it available). You can ONLY choose today or an earlier date for your publication date.
Then comes the Print Options section.
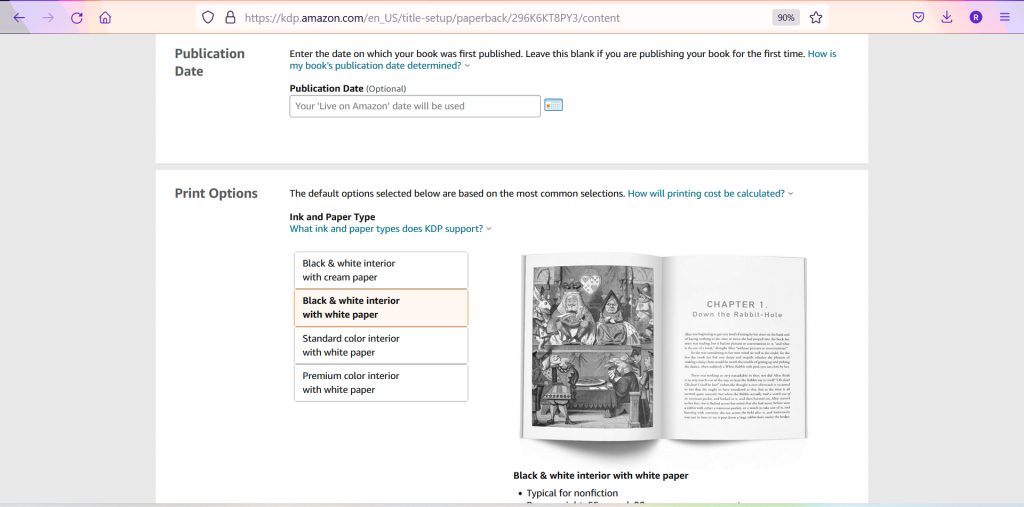
Most paperbacks are printed in black and white—this is simple black ink or toner on your paper, like most novels and non-fiction books you’ll see out there, most common for text-only books or even those with a few photos that can be printed in black and white.
The real choice there comes in your paper color. The pricing will be the same for these, but the cream stock is actually a bit heavier, so it will make the spine a little thicker and the book itself a little heavier in terms of weight.
Which to choose? Cream will look most like traditionally published books, and it’s easier on the eyes. Some people have problems reading black ink against stark-white paper. For that reason, I usually recommend cream (no one has ever complained about it in my hearing). But sometimes an author prefers white paper, and that’s obviously fine too. Pick whichever you prefer. (Mass produced books from big publishers will actually use Groundwood paper, which is now an option in Ingram but not in KDP as of the writing of this article.)
Note: Because white and cream are different thicknesses, it affects the spine size, which will in turn affect your cover design. You can choose whatever you like, but your choice will affect the final cover design, and you must then remember what you told your designer. If you do not select the matching option in this section, you’ll get an error when you upload your cover, saying it’s not the expected dimensions.
Note also that though cream is the more common option, KDP has “white” selected as the default. I cannot begin to count the number of times that, as a cover designer, I’ve had a client email to say, “Help, Amazon is telling my cover is the wrong size!” when really they’ve just forgotten to click “Black & white interior with CREAM paper” as their option.
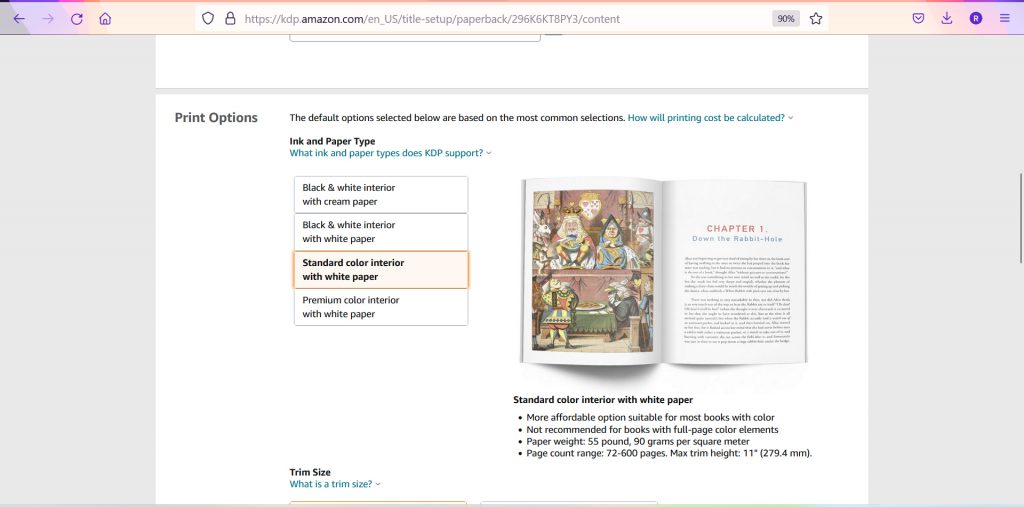
Of course, you also have the option to print in full cover. Have you created a full cover book, like a picture book or image-heavy book that needs color? If so, you have two color options: “Standard color interior with white paper” and “premium color interior with white paper.” Premium is a better quality (and hence more expensive) paper, which may be necessary if you have pages with a LOT of ink coverage, which tends to be visible on the reverse side on standard paper. You can always request a proof to see which paper works better for your book. Note: You cannot just print a page or two in color; you must print your entire manuscript in either black ink or color ink, which makes color very expensive for anything longer than a children’s picture book.
If you click the color options, you’ll see descriptions of the paper and specifications.
Scroll down just a bit more, and you’ll see the Trim Size section. Now, by the time you’re actually uploading your book, this will obviously already have been decided, and you’ll just select what you’ve already chosen. But if you’re reading this as you’re in the learning and researching stages, you may still be trying to decide what trim size you’d like to use, so I’ll go through the options.

Amazon KDP will default to a 6×9” trim size; please note that this is a common hardcover size but less common (though still acceptable) paperback size. Most paperbacks on your shelf will either be 5.5×8.5” or smaller.
Here is the pop-out Trim Size menu.
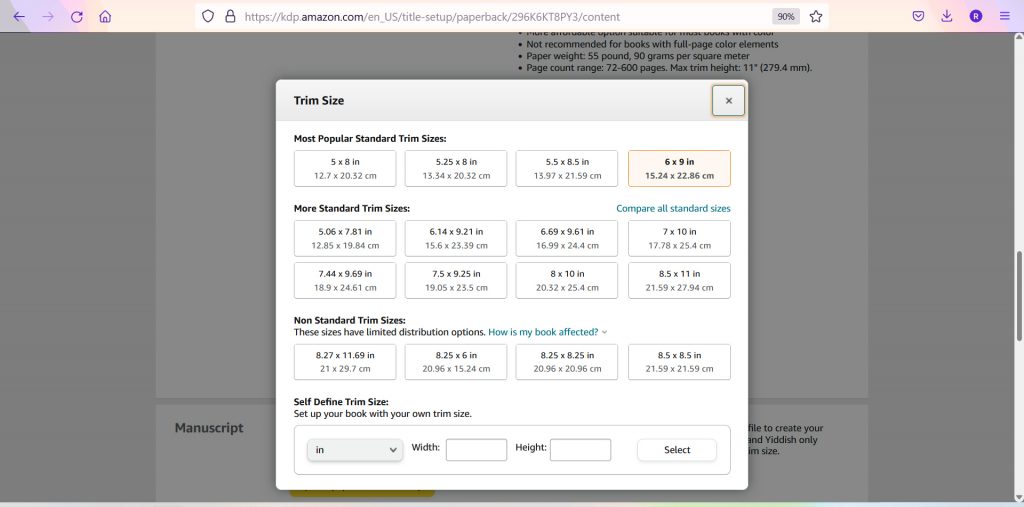
Not sure what size to choose? My first bit of advice is to grab out a book from your shelf in a similar genre to yours. Measure it. Some book types tend to be certain trim sizes. Another thing to consider is how long your manuscript is and how many pages you want the finished book to end up. If your book is only 40,000 words but you want it to be 250 pages to achieve the spine size you like, then you’ll want a smaller trim size. If on the other hand your book is 150,000 words and you don’t want it to cost a fortune, you’ll want fewer pages, so choose a larger trim size.
Underneath the Trim Size you’ll see the Bleed Settings.
What is Bleed? It’s when an image extends BEYOND the edges of the trim so that when printed, it will extend all the way TO the trimmed edge, not leaving a white space around it. This needs to be taken into consideration during the typesetting process. If your book contains to-the-edge images, your designer must create the file with a bleed of 0.125” on the outside, top, and bottom and then generate the PDF to include that bleed. You then must remember to select the Bleed option here in setup, otherwise KDP will object to your having content in the non-printing zone. If you do NOT have images like this, then keep the default “no bleed” option selected.
Paperback Cover Finish is the next section. You have the simple choices of Matte and Glossy, which are pretty self-explanatory in general. However, note that matte prints darker than glossy. If you have a cover with a lot of dark tones, they may not be distinct in a matte print; glossy, however, will help them pop. If on the other hand you have a light and bright cover, it may lack some depth in gloss. Here’s a side by side of the same cover printed in glossy (the hardcover on the left) and matte (the paperback on the right). For most mid-range-in-tone covers, you can choose based on your own preference and the look and feel you’re going for.
Now it’s time to upload your files!
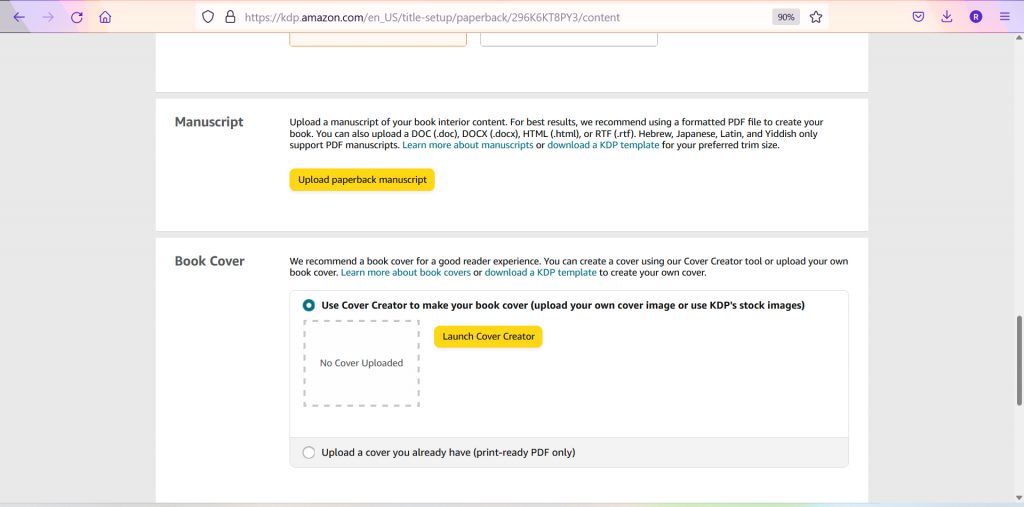
You must upload PDF files of both the interior and the cover; no other file format is acceptable at this stage, because PDF is the file format required for printing; what you see on the page in the PDF is EXACTLY what will print.
Go ahead and upload your paperback manuscript, and then the cover. Again, note that you can create a cover in the app, but it’s not advisable. Have your cover professionally designed and built on the KDP cover template for your trim size, page count, and paper color. You can find the KDP Cover Template Generator here. That generator can be used for both paperback and hardcover and looks like this.
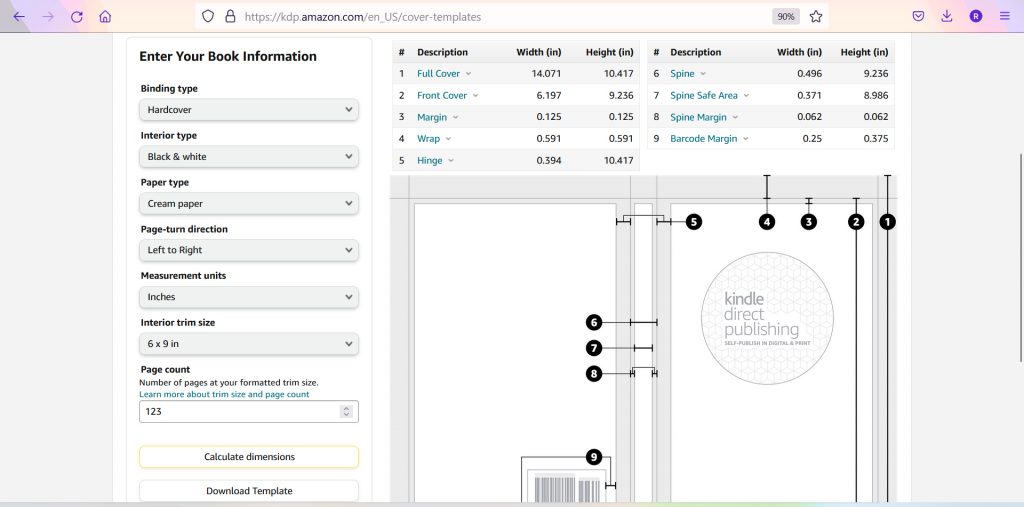

As you can see, you select paperback or hardcover; whether you’re doing black and white or color; what kind of paper you’d like; whether this a right-to-left or left-to-right book; whether you’re using inches or millimeters, and then the trim size. Once you’ve made those selections, enter your final page count once your book has been designed and the PDF is ready.
Note: KDP generates a new template for every TEN pages, always rounding up. So if your book is 223 pages, it will be on the 230 template.
Once you’ve entered all your book’s information, click the yellow Calculate Dimensions button. It will deliver you to a screen with ALL the dimension.
To make it easy on your designer, just click the “Download Template” button there on the left rather than fussing with all the individual measurements (unless you get a kick out of building your own templates, in which case, go for it!)
Now, back to uploading that cover…
You’ll see that there’s a checkbox in the cover uploader for whether or not you have a barcode on the cover already. If your designer placed that for you, click the button. If not, leave it unchecked, and Amazon will generate a barcode for you based on your ISBN (hence why you don’t need to purchase one). Note that the price will NOT be embedded in the barcode that Amazon provides. If you want a price, you’ll have to choose another app for generating barcodes and put it on there yourself.
Once you’ve clicked “Upload a cover your already have” and have selected the final PDF file of your cover, you’ll see some spinning icons as it uploads. Once both the interior and cover files have uploaded, the Book Preview section will then say “Looks like you’ve made some changes” and ask you to preview your book.
Click the Launch Previewer button, and it’ll take you to a new screen.
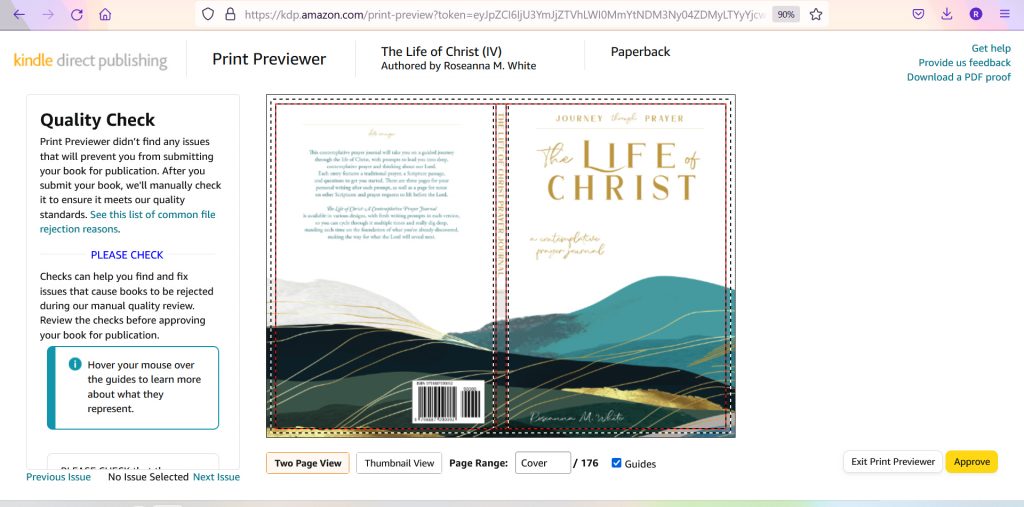
This is an interactive preview tool, much like the one in the eBook section. If there are any issues, it will tell you about them in that panel on the left, listing page numbers where images or text are outside the acceptable printing areas. You can also check your spine and back cover text alignment on the cover.
If you hover over the image, arrows will show up for paging through. Click those to see how the interior pages look, checking them carefully. Only once you’ve verified that everything looks right, click the Approve button. (If you see something you want to change and need to upload a new file, click the Exit Print Previewer button instead.)
You’ll then be returned to the previous screen.
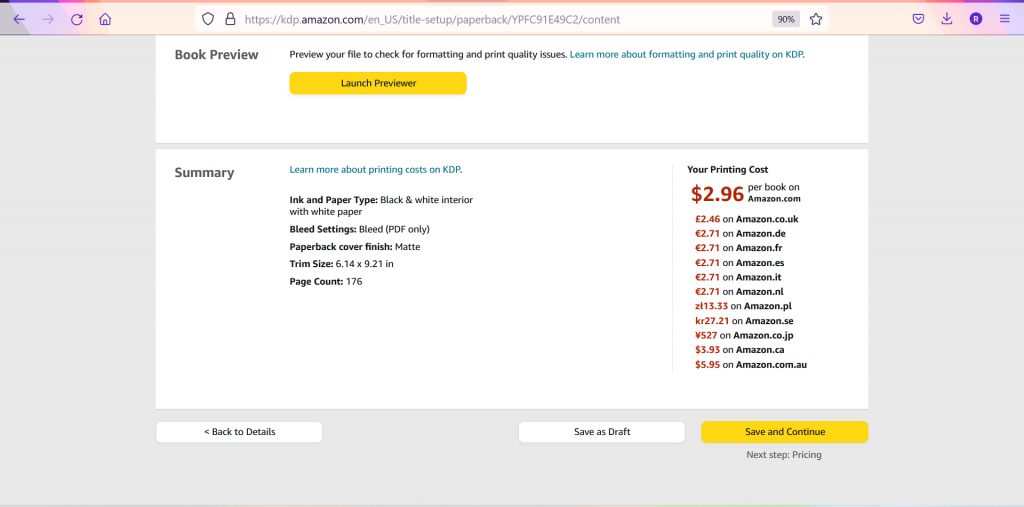
Once all your files are uploaded and approved, KDP will give you the pricing breakdown for how much your book will cost with your current selections. You can then advance to the final section: Pricing.
KDP Paperback Rights & Pricing
This screen is again very much like the pricing screen in the eBook setup. You select your territory, your primary marketplace, and then decide on your price.
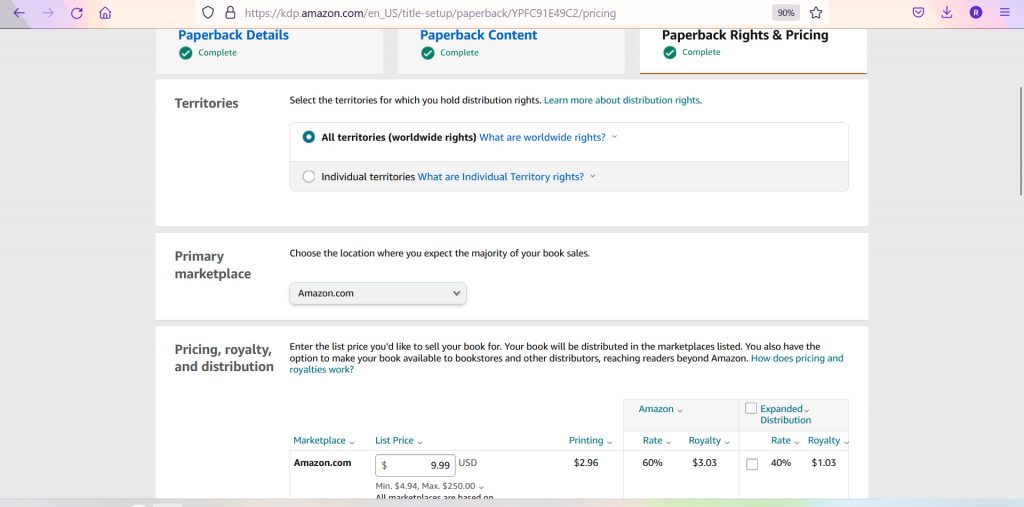
In the paperback and hardcover modules, you don’t get to choose your royalty option, but you DO get to choose your distribution. As mentioned in the section above, though Amazon offers expanded distribution (to stores and other retailers), very few stores will actually purchase from their biggest competitor, so if you’re interested in your book being available elsewhere, you’d be wise to consider Ingram for that option.
For Amazon’s pricing on their own platform, you receive a 60% royalty rate. You can plug in various prices to see what royalty that will mean for you. Amazon does give you a minimum and a maximum price, based on your printing costs and then their cut. Make sure you’re putting in a price in between those.
As before, the pricing in other markets is based on the US price; you can change them manually if you’d like or just keep the default conversions.
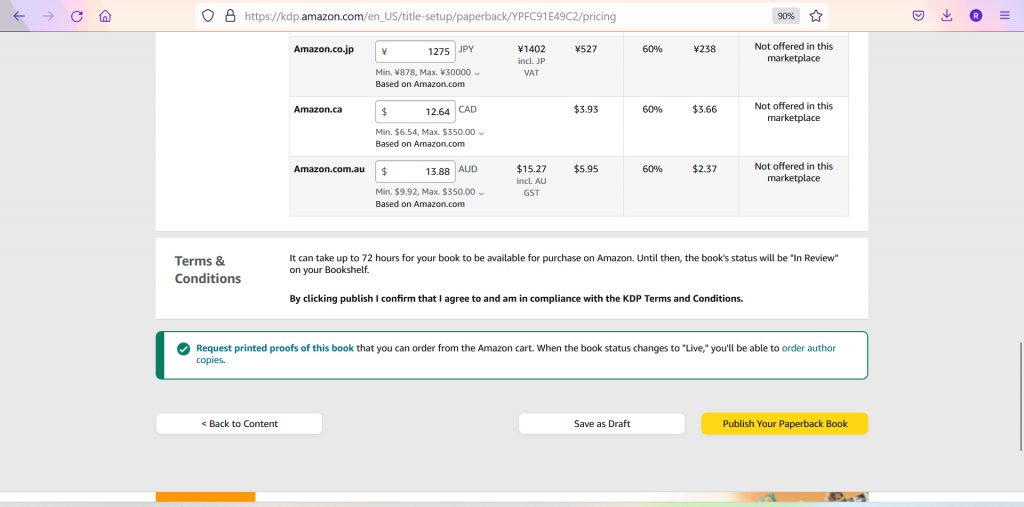
Once you press the yellow “Publish” button, your book will go into the review process and will be made live automatically. If you are NOT ready to publish your book yet, do NOT press the button, including if you want to review a print proof first!
You can order a proof copy of your book at this stage by clicking that link by the green check mark at the bottom of the page. It will take you to a page where you can order up to 5 copies.
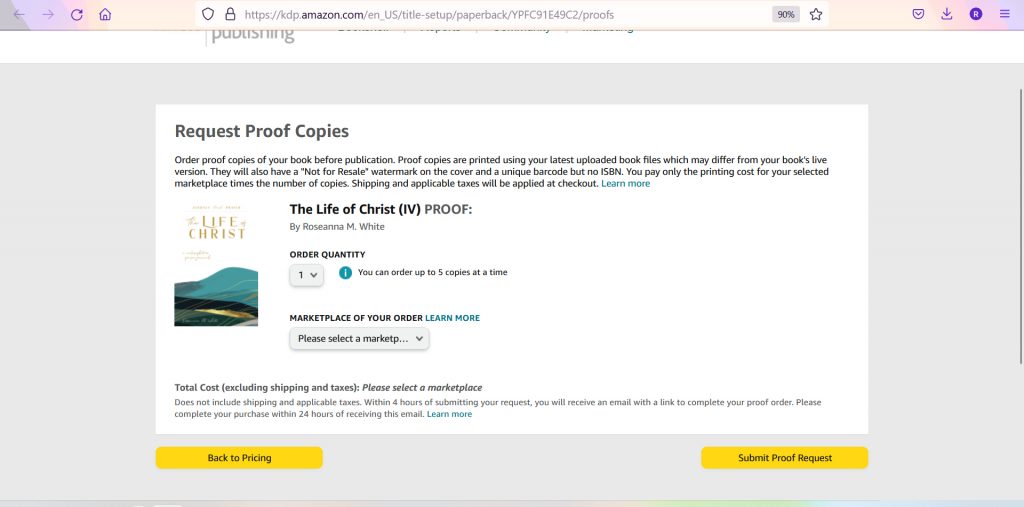
Select the marketplace you usually order from, and then click the Submit Proof Request; you will get an email within a few hours saying that the proof has been added to your Amazon cart, where you can complete the checkout process. Once you’re finished there, click the left-hand Back to Pricing button.
Once you’re ready, all that’s left to do is click the “Publish Your Paperback Book” option!
Need author copies? Return to your dashboard and hover your mouse over the … button to the right. You’ll see this pop up:
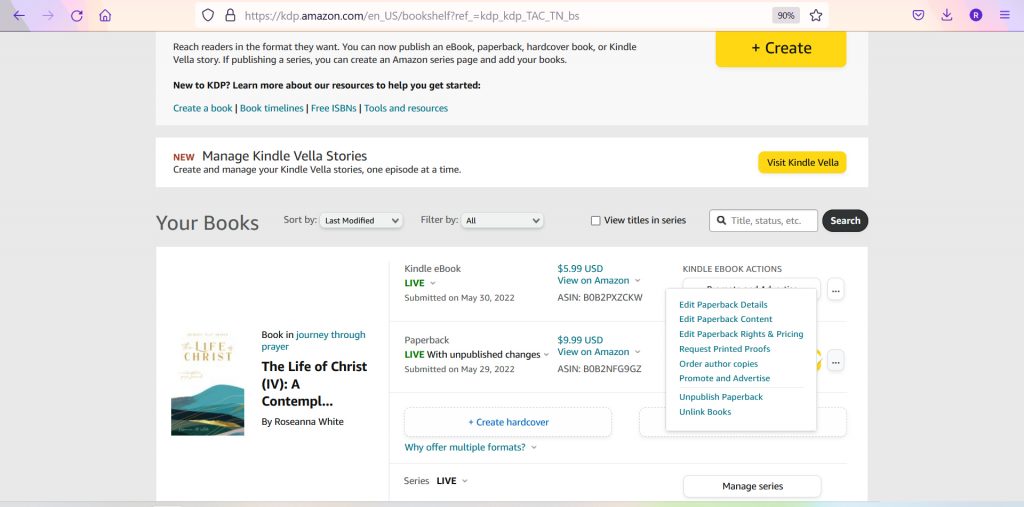
You can use that to click on any of the options there, one of which is “Order author copies.”
Creating a hardcover version is exactly the same as a paperback, so follow those instructions again.
And there you have it! Your book is up on Amazon KDP! You’ll receive emails as the various stages of processing are complete and your books become available in Amazon; the emails will include the direct links to your products.
It often takes a few days for the various formats of your book to link together in the Amazon retail site, but have no fear; they will be within a few days.
Also make sure you add your books to your Amazon Author Central profile!